Solution
- Create a Moodle Forum, this could be one of many types:
- Standard Forum
- Q&A Forum
- Each person posts one discussion
- A single simple forum (no multiple threads)
- Use the forum to ask questions or create topics for discussion.
- Consider using Restrict Access to limit access to certain seminar groups
- Moodle forum has multimedia buttons in the text editor that can be used to provide multimedia for teaching and discussion:
- Video icon – for making a 2 minute video directly
- Audio icon – for making a 2 minute audio directly
- eStream button – for uploading user generated content (e.g. from a mobile phone) or creating new content (Chrome browser/ web recorder; mobile phone camera)
Notes
Standard Forum
- Any student can start a new thread/ topic or reply to an existing thread.
- There is no limit to how long a thread or post can be.
- Threads/topics can be pinned by staff members to the top of the forum.
- Students can receive notifications when a thread is added to.
Q&A Forum
- In a standard forum, staff must start a topic, and students cannot see other students’ replies until they have posted their own
- Advantage: - later students are not able to write short ‘I agree with x’ type comments, and must actively contribute their independent thoughts
The other forums relate to the look and feel of them, for example, the "single simple forum" has no multiple topics, while the "each person posts one discussion" forum allows each user to post one discussion, which may be useful for determining activity completion criteria.
Relevant training
By Paul Young, Lancaster Environment Centre, Faculty of Science and Technology.
View more information on Paul’s blog.
Background
I teach a maths refresher course for first year environmental science students, where I’ve always made extensive use of a whiteboard or pen and paper. I’ve been looking to replicate this for online settings, both for making short videos as well as for live streaming, such as during a Teams call. For the latter, I’d ideally like to be able to capture any footage of my writing too, perhaps for students who aren’t able to attend the session.
I know there are online Whiteboard and tablet solutions, but I don’t have a new enough iPad and Apple pencil to hand, and I also like the free-flowing pen and paper more than stylus and screen. I also like to draw in meetings, so anything workable would have high value for me.
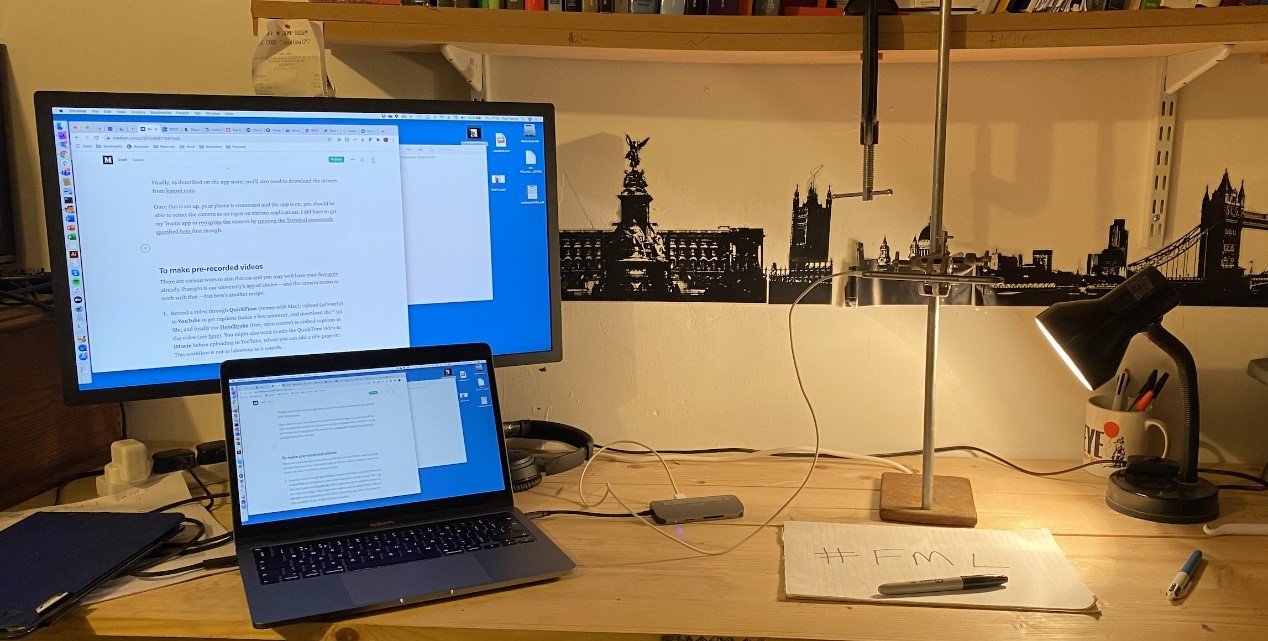
Given all this, the “easiest” way to achieve what I want is to create a homemade visualiser, using my phone as a webcam positioned above pen and paper. Below is how I’m currently doing it.
How did you go about it?
This is the hardware I used:
- MacBook Pro (I’m using some Mac-specific software below, but I think a PC approach should be possible)
- iPhone (…but the webcam app has Android versions)
- Lightning cable to connect phone to computer
- Lab stand and clamp to hold phone above paper
- Desk light
- Pen and paper :-)
Make your iPhone a webcam
EpocCam seems to be the most used solution for this and it works for me. The app allows you to use the phone as a webcam, and with much better resolution than my MacBook’s built-in one. You could use it for standard calls as well.
For better resolution, I suggest you get the paid for version rather than free app (£7.99 in the UK, $7.99 in the US). I would also suggest that you connect it via a cable rather than through Wi-Fi. You’ll also need to download the drivers from kinoni.com, as described on the App Store.
Once this is set up, your phone is connected and the EpocCam is on, you should be able to select the camera as an input on various applications. I did have to get my Teams app to recognise the camera by running the Terminal commands specified from Microsoft first though.
Arrange your desk
I’ve borrowed a lab stand and clamp from work and added a desk lamp I had lying about. For the tests I’ve done, this has worked fine.
To make pre-recorded videos
There are various ways to skin this cat and you probably have your favourite already. Panopto is our university’s app of choice— but here’s another recipe, which also sorts out the accessibility requirements:
- Record a video through OBS Studio (open source; download OBS), selecting the EpocCam as the camera input. I stuck with the laptop microphone.
- Upload (privately if you like) to YouTube to get automatic captions. This is not immediate, but they appeared pretty quickly for my short test video.
- You can directly share the YouTube link for a captioned video, or upload a captioned video to Moodle. For the latter, download the YouTube captions as a *.srt file and then use Handbrake (free, open source) to embed the *.srt file captions into the video. You can then share and export the captioned video wherever you like.
You might also want to edit the OBS video in iMovie before uploading to YouTube. This would enable you to add a title page, or even music.
Overall, this workflow is not as laborious as it sounds.
To use live stream (and record)
I envisage doing this as part of a virtual office hour, either as me-to-many students, or one-to-one.
One approach would be to use EpocCam straight through Teams, but this doesn’t make for easy recording. A better solution is to use Teams’ screen share to show an OBS feed of EpocCam. This allows you to record whatever you’re writing in OBS, so that you have a video(s) for later processing and sharing as above.
What’s your experience of using it during the last few months?
Experience wise, I used it successfully and extensively for real-time tutorials and workshops during the first term and then for a short piece of teaching this past term. I didn’t record workshops, but created and uploaded short videos afterwards if I needed to provide explanations of how to do a calculation etc. The students were used to watching maths/science videos on YouTube and commented that my visualizer set up was “just like the real ones on the internet” (!!!)


.jpg)